Yea! The Tutorial is finally Done!
What a busy, fun, and exciting week!
I was absolutely tickled pink but more like totally
surprised and honored when I found that my
surprised and honored when I found that my
Ballard Designs demijohn bottles with bling were featured
over at Knockoff Decor.com and at Hometalk.com
over at Knockoff Decor.com and at Hometalk.com
I was even approached by a friend to do a class
and share and teach how I made my bottles!
First time ever something I had made was such a
big hit. I'm truly grateful to so many for this. I've had
over 7,544 hits here on the blog in three days! They
have been shared all over Pinterest and Facebook!
I never dream so many would like these simple
little bottles! I am very grateful they were received
so well.....it's so nice to have nice things happen
once in while!
Thank you!!!
With such an overwhelming happy response to my
"Ballard Design Demijohn Knock Offs With Bling"
shown below, I was asked by so many to do a tutorial.
I am happy to share.....So here it is!
 |
| The bottles I made with bling! |
If you have any questions, contact me here in a comment
and I'll respond as soon as possible. I hope these are clear
enough for your success in making pretty bottles for yourself!
Enjoy!
Supplies you'll need:
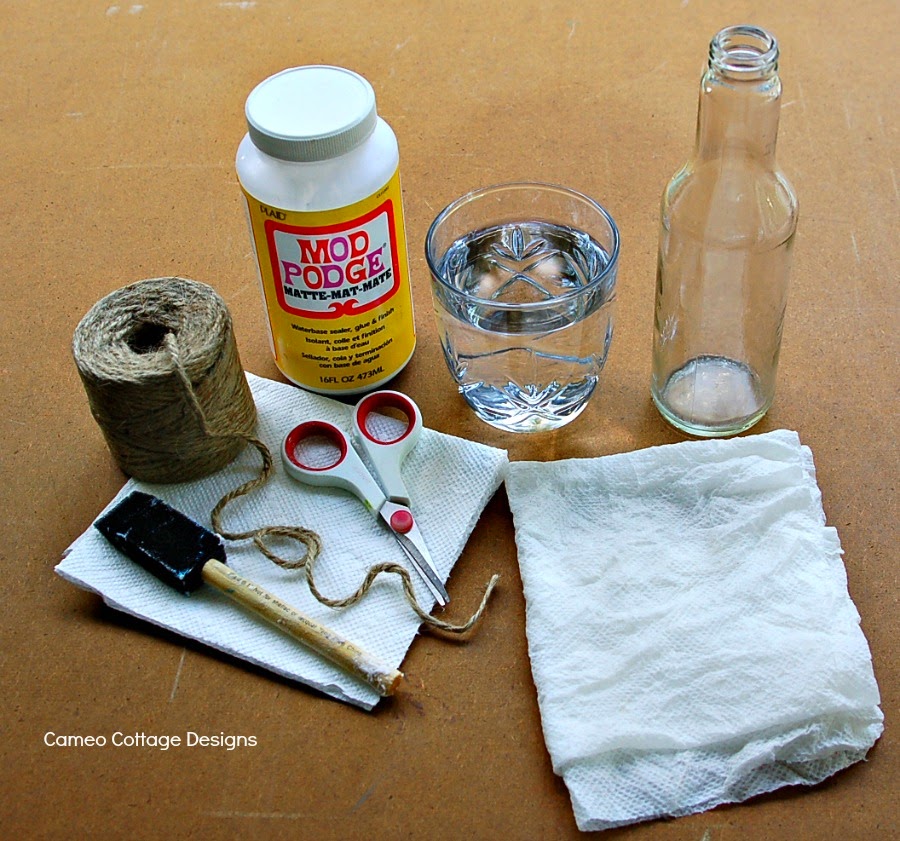
glass bottle....a wine bottle is great!
Mod Podge
jute/twine or small size rope
glue gun and glue sticks
scissors
craft paint sponge brush or paint brush
cup of water to rinse brush
dry and wet napkins

After I did my bottles I accidentally found this demijohn
and for a steal! Was so excited! This is what I'm using
for this tutorial....I can't wait to see it done!
Got your bottle ready!? Let's rock and roll ladies!
and guys! This is so much fun!
All the pictures are numbered with numbered instructions to match each step I'm explaining for you. I learn so much better by pictures than I do by written instructions.


Supplies you'll need:
glass bottle....a wine bottle is great!
Mod Podge
jute/twine or small size rope
glue gun and glue sticks
scissors
craft paint sponge brush or paint brush
cup of water to rinse brush
dry and wet napkins
After I did my bottles I accidentally found this demijohn
and for a steal! Was so excited! This is what I'm using
for this tutorial....I can't wait to see it done!
Got your bottle ready!? Let's rock and roll ladies!
and guys! This is so much fun!
All the pictures are numbered with numbered instructions to match each step I'm explaining for you. I learn so much better by pictures than I do by written instructions.
1. Starting at the top of your bottle, take the end of your roll of twine/jute and wrap it around the neck of your bottle where you want your netting to begin. You are going to be making a ring.
2. Cut the twine/jute the length you need around.
3. You can either tie a knot (cut a little extra to allow for the knot).... or, I wanted my ring cleaner looking so I dabbed a good amount of glue on both ends of my twine....overlap the ends about a quarter inch or a little less. When the glue is cooled down enough to touch but not set and dried yet, I squeezed the twine ends together and start rolling it back and forth in between my fingers to get the glue to smish into the twine fibers, and connecting the two ends together smoothly. Be careful not to burn your fingers! After a couple of times of burning my fingers, I learned to wait a bit instead of being in a hurry lol!
4. Place your ring on your bottle.
5. Now take the twine, and measuring from the top of your bottle to the bottom, take that length and x's that length by 4. (Example).. If your bottle is 5" tall, then your cut length would be 20" long. It's better to have extra than not enough. Now cut six pieces that length. I have even times it by five. Don't worry about all the excess you might have left. If you are going to do the twine wrap at the neck of your bottle, we'll use those pieces left over on that! I waste as little as possible! (A tighter weave means lots more knots! The more knots the more twine you need!)
(Note) The more strands of twine/jute you use, depends on how far spaced your netting, or weave lets call it, will look. If you want a wide/large loose look netting (how large your diamond shapes will be, you'll see this diamond shape look shortly) then you would use less strands... like six. If you want a tighter weave you would use more. In the picture of my bottles up above, on the large bottle which measured 13 1/2" high, I used 10 strands, on the medium size bottle which measured 11 3/4" high, and small bottle which measured 9 1/2" high, I used 9 strands for both. On the demijohn I'm using in this tutorial, I'm using 15 strands. (I want a tighter weave net look.) Remember, less strands = larger loose weave, more strands = tighter weave. Example in the photo below of each.
6. Take your first long strand and find the center of it and fold it in half...pinch it tight to form a bit of a crease. I do that so I don't lose my center allowing me to keep my strands even in length when attaching my strand to the ring.
7. Take the folded center of your strand and slide it up behind or underneath the jute/twine ring at the neck of your bottle. (picture 7. shows what I mean here.)

8. Now pull your folded center down over the ring making a loop, and pull your strands up through the loop.
9. This shows you have like a heart shape.
10. Pull the strands all the way through this loop to create your loop knot..make it snug up to the ring.
11. Continue doing that with all your strands and it should look like picture 11. when your done. Then I evenly distribute the strands on the ring if needed just by sliding them left or right. If you have used six strands to start with, you know have 12 strands to work with from your six knotted loops. Hope that makes sense....just look at the pictures! :)
12. I work to the right as I am making my netting....now take two strands, one from the knotted loop to the left....(which would be the right side strand,) and a strand from the right side knotted loop, (which would be the left side strand,) and then gage where you want your first row of knots to be on your bottle. Start there to tie your knot. It's important to keep your strands in line with how they fall. You don't want cross overs. Hope that made sense. Picture 12. shows what I mean I hope. This picture also shows where I am placing my first knot to start, and pictures 13.- 14.- and 15 shows how I make the knot.
This photo is how my hand is holding the jute between picture 14. & 15. It shows how I hold the twine to create the knot with my left hand. What it isn't showing, because I am snapping this picture with my camera is, my fingers of my right hand are holding onto the two pieces of twine laying over my thumbnail. I am going to pull the two twine strands that's underneath my thumb through this loop to the left until both strands have come all the way through. You then push the knot tight. You may have to adjust a little bit if tightening the knot made the knot go up higher from where you had decided you wanted your knot to lay to start your first row of knots. Just loosen the knot and ease it down a bit and tighten the knot back up again. Or if it is to low, you reverse that instruction. How you doing so far!? :) If your good, lets move on!
16. Now make your second knot. Once the knot is made, check to make sure its in line with your first knot. If not adjust it so they are even across as picture 19. shows. Now just continue around your bottle until your first row is done.
19. Now your first row of knots is complete.
20. Now start the second row repeating the same process you did to start your first row. Picture 20. shows some arrows. Now you see a diamond shape formed with your second knot. When deciding where you want your second row of knots place and to keep an even uniformed look all the way through making your netting, keep this in mind. The two top black arrows show the length of the twine strands from the ring to the first row of knots. The bottom two black arrows show the length of the twine strands from when you start your second row of knots (the white arrow.) Keep those lengths the same on each row all the way to the finish. A teeny bit off is ok, but you want each of your rows and the sizes of your diamonds to look uniformed throughout the entire knotting process. You get a good professional look that way! :)
Yea now we have reached the bottom of the bottle!!!! Ignore the neck of the bottle for now...We will do that last if you choose to want to do that. Now this to me is important....your LAST row of knots should hit right at the bottom edge of your bottle so as you set it upright flat on a surface, your knots aren't under the edge. Adjust the knots up more if it is. It's ok at this point if your diamond shape is a bit off.
Now lets get this baby finished!!!! There are two ways you can do this....I'll show you my way first...then the other ok?
Like I said before I like smooth finished surfaces. So as you see in the photo above, I have pulled each set of strands tightly, starting with one set on one side (left) of the bottom of my bottle, and take my glue gun and glue it in towards the center (not all the way to the center) of the bottles bottom. You don't want a big hump under your bottles bottom! Then I take another set of strands on the opposite side (right) of the bottle and do the same thing. Think of a clock....12, 3, 6, and 9. Those are the strands I glue first. Then I glue down the rest in between each. (I do that to help get an even pull down of my netting because if you pull down on one side, it tends to make the ring at the top of your bottle shift. You want that ring to lay even all the way around the top of your bottle when your finished with the bottom.) Then I trim all the excess strands of jute off from where I glued them down. When the glue isn't so hot and cooled some, I press the jute ends down into the glue and smooth them out on the bottle. When it is all done it will look like this.....below:
See how the jute butts up against the bottom knots. Now the bottle will sit nicely flat on your surface. No rocking!
Ok... moving on to get this finished look! Now glue doesn't always adhere to glass well. So the next step I do is taking my jute and do a wrap all around the bottom of the bottle starting in the center and work around until I've reach the last row of knots at the bottom of my bottle. (Seen up above.) I use my Mod Podge and twine/jute to do this with. I start by taking my roll of twine end, and dip the end of it in the Mod Podge. Don't cut off the twine yet....you will need a lot! Then I start wrapping around and around making a small circle in my hand, and then I brush Mod Podge all over the top and bottom of it. I find the center of my bottles bottom, and place my little circle there. I wait a few minutes to let it dry and hold in place. The photo's below show how I started my little jute circle to jute wrap the bottom of my bottle. Warning this gets messy! Oh and if you would like to know how to Twine Wrap Bottles in twine from bottom to top see this tutorial here:, it's at the bottom part of the post. These photos come from my tutorial of that there.
Once firmly in place I take my sponge brush and smear Mod Podge all over the twine strands, dried glue, and the bottles glass bottom. Then I continue wrapping around and around the little circle keeping each wrap snug up to the wrap before. The Mod Podge dries pretty quickly so I have to be brushing more Mod Podge as I go until I have reached my knots at the bottom side of my bottle. Then I snip the end off, brush it with Mod Podge and press it up close to the last row around I did. I then go and press down all that jute wrapped bottom making sure my wrapping has attached itself to the bottom well and nothing while I was wrapping got an air bubble somewhere. And I am DONE!!! With the bottom anyway.
******************************************************
Now the other way to finish the bottom off is by making another ring like you did on the neck of the bottle. Make it about half the size of the circumference of the bottom of the bottle.
Next, tightly pull and tie all of your strands to the ring and tie the same knot you did through out your bottle netting.
Once all your knots are done, trim all the extra pieces of jute and I recommend adding a dab of glue to the knots to keep them from coming undone. And your done! With the bottom anyway....this way is a lot faster and less messy, but sometime those knots stand in the way of the bottle sitting flat on a surface. It can also raise the bottle from the surface it's sitting on too. And again, I like mine to look finished on the bottom. It just comes down to your preference.
I don't have a photo of that because I didn't like it and did it the other way. Sorry. Just imagine a ring with your strands tied in a knot to it. :)
Almost DONE!!!! Hurray!!! Now lets get this neck finished!!
This part is pretty easy!
Take the end of your twine again, and dip it in the Mod Podge. Lay it on your bottle (I start at what will be my back of the bottle,) and lay it right above the ring close. Let it set to adhere to the glass. Next, take your sponge brush and dip it in your Mod Podge and brush it around the neck of the bottle, just one once around. Now start wrapping your twine around and around, brushing more Mod Podge as you go. Make sure to keep all the twine wrap close together as you wrap so there are no gaps. When you get to the top, snip off the twine...Mod Podge the end and lay it up against your last row. And you are finally finished and have a beautiful bottle to add to your home decor! If you want take a look at the link I put up above for the Twine Wrapped Bottles to see more detail in pictures.
(NOTE)....I mentioned up above at the beginning of measuring your strands of twine for the knotted netting for your bottle, that you might have a lot of excess twine left when you cut your strands off at the bottom. And I mentioned I waste little. I had for this bottle several long lengths of twine after cutting it off at the bottom. I used these strands to do the twine neck wrap. You can't even tell the neck wrapped area was done in pieces! See no waste here! :)
(NOTE)....I mentioned up above at the beginning of measuring your strands of twine for the knotted netting for your bottle, that you might have a lot of excess twine left when you cut your strands off at the bottom. And I mentioned I waste little. I had for this bottle several long lengths of twine after cutting it off at the bottom. I used these strands to do the twine neck wrap. You can't even tell the neck wrapped area was done in pieces! See no waste here! :)
Done!!!!! Now Enjoy your new creation! Make more too!
Now if you want, add some bling on the front!
Now if you want, add some bling on the front!
Just an idea to share that I did.
When I finished this big demijohn I thought I wondered
how it would look with a topper. Not that it needed one
but I just wondered. A couple of years ago, I recycled my
light bulbs by wrapping them in twine just like you do twine
wrapped bottles, and I stuck a stick on the screw in part of the
bulb and made pears! Well I spied them in a bowl on the table
and thought hmmmm....might work for my bottle topper. This
bulb was a three-way light bulb so it was larger. I stuck it in
upside down and darn if it didn't work and the right size too!
You could do this on smaller size bottles too, just use smaller
light bulbs! Or corks absolutely work the best too!
And of course I pinned on some bling! I love sparkly!
It's a pretty piece....although the picture doesn't do it
justice.
And this is my recycled light bulb pear!
I hope this helps you to make your own demijohn
knotted twine net bottles. Between the photo's and
instructions, you should be able to be successful!
It's so hard to do this especially the written instructions
so I hope I passed in helping you.
TaTa for now!!!
I am over this lol! Three days spent doing the bottle,
taking pictures, editing pictures, and writing instructions,
and posting the tutorial! Love you all but I am outta here!
Oh and this technique can be used on so many things!
Lamp bases, lamp shades, flower pots, vases, cans, bottles,
candle holders, glass balls, and the list goes on!
Have fun and Enjoy!
Sharing Here:
Debi - Your tutorial is great. Have a good long weekend - you deserve it! I guess there is good and bad to posting a popular DIY project and having so many folks wanting directions. Enjoy the journey. Gwen
ReplyDeleteThank you Gwen! I'm so glad it's understandable! Who would have thunk lol. I am happy so many liked the idea though. Glad the tutorial is done. With only one hand it was hard taking every detail of the process. My hubby was going to help or tried, but he only has one arm and hand because of a strok, and so it wasn't easy for him... and the pictures were kinda of fuzzy. So I'm glad it makes enough sense to follow! :) Have a great Memorial weekend yourself! Have three of my grandbabies here so I'm am busy busy busy having fun with them!
DeleteDebi, I just finished reading the tutorial, my first language is Spanish and sometimes is difficult to understand tutorials, let me tell you that tomorrow I'll look for my perfect bottle since I understood everything. Thank you for your time and knowledge.
DeleteDebi, that is so beautiful; starting with the beautiful shaped demi-john bottle. Why is it called that? Yours are much better than Ballard Designs..they'll be copying you when they see yours or asking you to make theirs for them. Great job on the tuitorial and not sure I could do it without you sitting beside me guiding me through it but like you, I like the tight space weave best..looks more professional. Living in Fla. I bet you find a lot of bling(costume jewelry)at yard sale or antique shops, estate sales. I probably have some around here that you could use.. We don't have a Ballard Designs near us. The only Pottery Barn now is over in Northern Virginia..the mall where they were located is in process of being torn down or maybe has already been torn down. Thanks for sharing the tuitorial and showing us the finished project. Absolutely stunning! What other crafts do you do?
ReplyDeleteThank you Pippi21! You know I didn't know why it's called that either so I did a research on it lol....made me wonder too! This is a story I found....wonder if it's true! Sounded cute though.....
DeleteHere is the story...(Possibly, back in the seventeenth century, there was in France a buxom barmaid of such portliness and jollity that her fame spread throughout the countryside.
Her name, it would appear, was Jeanne, known to all as Dame Jeanne.
We may further surmise that at this period some wine merchant of the region began to use flasks of an unusual size for bottling his wine, bottles that would hold 20 liters or so.
Some wag, it would seem, seeing these large bulging bottles encased in rush and with rush-work handles at the sides, was reminded of the neighborhood barmaid in her peasant costume with arms akimbo. Struck by the resemblance, he shouted, “Dame Jeanne!”
That story is entirely conjectural. All that is certainly known is that the bottles were known by the name dame-jeanne in France in the late seventeenth century and are still so called. The Spanish name is dama-juana, the Italian, damigiana, both meaning “Dame Jeanne.”
When introduced into England, they were first known by the French name, dame-jeanne, which, thanks to the English difficulty with French pronunciation, became corrupted to our present demijohn.)
That would be too funny if we start seeing bottles like mine in the Ballard Designs cataloge or some other store. Wouldn't surprise me though....I believe these store chains GET most of their ideas from people who have ideas. When they see how popular they are, they cash in on them....always with huge prices! I highly doubt that they would ask me to make them, they will use slave labor so they can make a mint!
I am always on the look for bling! Never can enough of that lol! It was my pleasure to share and I do a little bit of everything! :)
Well dang! that was a LONG response for crying up a river!!!! Nice chatting and thank you for all your compliments and hopefully you can make some for yourself. If you have trouble just let me know and, if we can't get you through it....you can always take a vacation in Mount Dora, Florida! :) Hugs!
Debi
Oh my gosh these are great! Your tutorial is so thorough and easy to follow that I want to take my big turquoise bottle and cover it right now! It will add to my collection of beachy things that I am using to try to recreate a beach house in side my little home until I can win the lottery and buy one that is actually on the beach ;) Thank you so much for taking the time to share your process! I'm signing up to follow you and looking forward to more cool ideas!
ReplyDeleteAndi
Thank you ItsdaMama! So glad you can understand the directions! Thank you for the visit, follow, and interest! Let me know when you get that beach house! I'm working on mine too! :) Have a great week and Happy Memorial Day! :)
DeleteTaTa
Debi
itsdaMama! Last year we had our sunroom painted a beautiful turquoise with white woodwork and that's as far as we got. I wanted to add coral and make it look tropical because we loved Hawaii but have been thinking it is easier to find items that are beachy than tropical. I would love to try my hand at making one of these but don't feel confident enough. I have several costume pins that could add Bling..like Debi did..Isn't her bottle absolutely beautiful? So professional looking too!
DeletePerfect tutorial. Thank you for taking time to do this. I love the idea and will add it to my list of to try tutorials. These would work great for country themed wedding centerpieces. A little burlap and knots. Lovely vase. Again, thank you.
DeleteDebi, this bottles are adorable! Thank you for the fantastic tutorial, I think I've to try it! Yours are fantastic.
ReplyDeleteAll my best from Austria and a happy happy time
Elisabeth
Thank you so much Elisabeth! Thank you so much for your visit and sweet comment....and all the compliments! If you try it enjoy! They are fun to do! Best wishes to you too! Have a lovely day! :) Thank you again! :)
DeleteNow schedule your class! These are awesome!
ReplyDeleteI know I know! So sorry I haven't done it yet....I just can't stop making things lol! And thank you! Hugs!
DeleteSuperb Tutorial! ❤️
ReplyDeleteThank you so much MB! Thanks for the visit and comment too! Lovely to have you here! :)
DeleteThank you
ReplyDeleteYou're welcome! :) Thank you for the visit and your comment! :)
DeleteThis is absolutely fabulous! I love, love, LOVE it! Thank you so much for your amazing tutorial! It's obvious how much time and effort you put into all the photos and directions. :)
ReplyDeleteHugs,
cathy
Thank you so much Cathy! And, you are very welcome! So thrilled you like the tutorial and the bottles. I appreciate so much your visit and comment. Have a wonderful day!
DeleteHi, Debi!
ReplyDeleteI loved your project so much that I posted it on my blog with a link back here. I hope that's okay. Here's the link: http://stampsandscrapbooks.com/2015/03/knotted-bottles-tutorial.html
Oh my goodness Cathy....I am honored you shared the tutorial! Of course it is ok. Thank you so much! You're kindness is most appreciated and so happy you loved it and could understand it all! Hugs and thanks again! Have a beautiful day...you made mine! :)
DeleteThank you so much for this lovely tutorial. I just have one question, please could you tell me the best way of sealing the finished item so that it doesn't attract dust etc. Or would you recommend perhaps just using the vacuum hose to get rid of dust. Again, thank you so much.
ReplyDeleteHi Pamela and thank you so much for the visit and your interest and comment! In answer to your question, I have never sealed one of these, but as far as cleaning the dust, I normally just take a duster to it, and I have used the dust brush on my vacuum also. Either usually does the job of removing the dust. Hope that helps! Thanks again and have a lovely day!
DeleteThank you Nicola so happy you like it! So sorry for such a long delay in responding to your comment.....and thank you so much for the feature.....I'm honored. Thank you for the visit and your comment! Have a beautiful day!
ReplyDeleteWhat an awesome idea! As soon as I saw your project, I immediately knew what my next project would be. We had just finished celebrating our daughters 25th birthday and had just finished a huge bottle of Vodka that I purchased from Costco. I thought it was such a great looking big bottle that I knew I would be using it for something and then I found your Pin on Pintrest. Anyway, since the bottle was clear, I just scraped the writing off with my switch blade. Instead of jute rope I decided to give it color and used turquoise yarn. Needless to say, it came out great and beautiful. Thank you for the idea.
ReplyDeleteThese look wonderful and I've Pinned your tutorial, but, darn, to me it's just as confusing as macrame was back in the 70s and I never did the hang of it.
ReplyDeleteThank you for providing such a detailed tutorial for your beautiful embellished bottles! I haven't done such in years, you have now inspired me to give this a try ~ I can only hope mine will be as pretty as yours. Thanks again ~
ReplyDeleteThank you for such an excellent tutorial. Your work is exquisite. One thing I like about it is the size of the project. If it doesn't turn out well, you can see the faults & improve quickly on your second try.
ReplyDeleteI have been looking for a DIY for decorating my collection of wine bottles and other alcohol bottles. my ideas are endless not with your method on how to at the rope design I am now thinking of what other material I can use to create a similar affect. Your Blog is ever inspiring.
ReplyDeleteDying, painting or usign knitting yarn are some ideas I have.
Thank you
Dear Debi, I work in primary school and on tehnical education, with colleague, decided to do your bottles with 15 years old students. They are very patient and we are slow workers. Hope they going to look half as good as yours. Yours are amazing and tutorial is great and easy to follow. Thanks and good luck from Croatia
ReplyDeleteGreat tutorial and just what I needed for my project! I recently thrifted 4 large apothecary bottles (think huge vintage bottles for pills in a drug store back in the day). I wanted to make something that looks like a jute wrapped demijohn and this tutorial is perfect. Thanks so much!
ReplyDeleteI'm doing this project right now, but I was having issues getting all of my knots even. So, I'm doing square knots instead!!!
ReplyDeleteThank you for this!!! I couldn't have done it without you.
ReplyDeleteI just found you!!!! O.M. G., you are my gift for the entire year. I have looked every where for a detailed, understandable, well written, and well demonstrated tutorial on these bottles. I thank you for everyone as passionate and excited as I am! Oh glory, I have to go make knotted bottles!!
ReplyDeletelovely creativity,thanks for sharing this.
ReplyDeleteCommodity Market Tips of Silver
nice art.. very beautiful bottles
ReplyDeleteMcx Recommendations
Beautiful work. I stumbled on this page while struggling to find a way to create the netting on miniature vintage hot air balloon sculptures I'm creating. Your net knotting technique is perfect for that too. Halfway down the ball (balloon), I'll stop the diamond knotting and carry several of the strands down to the wicker gondola. Your excellent tutorial successfully wraps up my search for how-toos on this project. Now I actually want to do a bottle in my cobalt blue bottle collection too.
ReplyDeleteI have plenty of wine bottles , but didn't know how to make use of it. Now i have many idea to start with, thanks for sharing!
ReplyDeleteHI! These are so lovely - my daughter and I want to try this with some bottles for her wedding reception table. Thinking we will need about 20 of them -- how much time per bottle should we allow?
ReplyDeleteThanks so much!!
Hi DeDe! Thank you much for the compliment and the interest...Depending on how fast you work once you get one done to see how it's done, I would say as it's been awhile, that it could take a couple of hours per the wine size bottle. Hope that helps and good luck. Congrats on the coming marriage! :)
DeleteWow! Products are just awesome!
ReplyDeletePretty! This was an incredibly wonderful post. Thanks for providing these details.
ReplyDeleteThanks a lot for your tetorial and your work icanot wait to do it by myself
ReplyDeleteI have been collecting these demijohns for years, making lamps with them and hanging them in trees. My problem was hanging them straight as the cord hanging them by the neck tilted them.I am so glad to find this tutorial, will buy jute Monday and get right to work!
ReplyDeleteThanks for your creativity and the patience to make such a clear tutorial!
Bardzo mi było miło gościć u Ciebie . Ten temat bardzo mnie interesuje . Pozdrawiam życzę udanego Nowego Roku Jurek
ReplyDeleteHeel mooi gemaakt. Nog hartelijk dank voor het knopt patroontjes.
ReplyDeleteThank you very much!
ReplyDeleteWow! I just found your site after doing a Google search for twine wrapped bottles. Thank you for the tutorial. I too learn better by photos than written instructions. Your bottles look great. I have enjoyed your other posts as well. You are so talented! Please keep on posting these great DIY's!
ReplyDeleteSo clearly your diy project is.
ReplyDeleteHi Debi - To be honest, I have not read through all of the comments on this project, so this point may have been brought up already. In your photo tutorial, when the instructions reach the point of the netting knots at the base of the bottle and we are then told to bring each strand under the bottle and glue it in a clock fashion, the pictures don't seem to jive with what is being said. The pictures show the bottom of the bottle already covered with the finished circular pad. I do not clearly see how you have glued the jute to the bottom underneath that circular pad. Otherwise, awesome tutorial and gorgeous bottle! I am anxious to browse the rest of your site for inspiration - thank you!
ReplyDeleteThank you so much. Your pics and directions are the best, so much detail.
ReplyDelete